Abstract: This short article demonstrates how to create a watermark effect on your TextBox and display instructions to users, without taking up screen space
Create an ASP.NET TextBox Watermark Effect using jQuery
This short article demonstrates how to create a watermark effect on your TextBox and display instructions to users, without taking up screen space. This article is a sample chapter from my EBook called 51 Tips, Tricks and Recipes with jQuery and ASP.NET Controls. The chapter has been modified a little to publish it as an article.
Note that for demonstration purposes, I have included jQuery code in the same page. Ideally, these resources should be created in separate folders for maintainability.
Let us quickly jump to the solution and see how we can create a watermark effect on your TextBox using client-side code.
<!DOCTYPE html PUBLIC "-//W3C//DTD XHTML 1.0 Transitional//EN"
"http://www.w3.org/TR/xhtml1/DTD/xhtml1-transitional.dtd">
<html xmlns="http://www.w3.org/1999/xhtml">
<head id="Head1" runat="server">
<title>TextBox WaterMark</title>
<script type="text/javascript"
src="http://ajax.googleapis.com/ajax/libs/jquery/1.3.2/jquery.min.js">
</script>
<style type="text/css">
.water
{
font-family: Tahoma, Arial, sans-serif;
color:gray;
}
</style>
<script type="text/javascript">
$(function() {
$(".water").each(function() {
$tb = $(this);
if ($tb.val() != this.title) {
$tb.removeClass("water");
}
});
$(".water").focus(function() {
$tb = $(this);
if ($tb.val() == this.title) {
$tb.val("");
$tb.removeClass("water");
}
});
$(".water").blur(function() {
$tb = $(this);
if ($.trim($tb.val()) == "") {
$tb.val(this.title);
$tb.addClass("water");
}
});
});
</script>
</head>
<body>
<form id="form1" runat="server">
<div class="smallDiv">
<h2>TextBox Watermark Demonstration</h2> <br />
<asp:TextBox ID="txtFNm" class="water" Text="Type your First Name"
Tooltip="Type your First Name" runat="server"></asp:TextBox><br />
<asp:TextBox ID="txtLNm" class="water" Text="Type your Last Name"
Tooltip="Type your Last Name" runat="server"></asp:TextBox>
<br /><br />
<asp:Button ID="btnSubmit" runat="server" Text="Submit" />
<br /><br />
Tip: Click on the TextBox to start typing. The watermark
text disappears.
</div>
</form>
</body>
</html>
The code shown above adds the “watermark” behavior to controls marked with the ‘class=water’ attribute. When the user loads the page, a watermarked textbox displays a message to the user. As soon as the watermarked textbox receives focus and the user types some text, the watermark goes away. This technique is a great space saver as you can use it to provide instructions to the user, without using extra controls that take up valuable space on your form.
The ‘Tooltip’ attribute applied to the textbox is crucial to this example. The ‘Tooltip’ gets rendered as ‘title’. Observe the code, as we use this ‘title’ property to compare it to the textbox value and remove the watermark css, when the textbox control gains focus
$(".water").focus(function() {
$tb = $(this);
if ($tb.val() == this.title) {
$tb.val("");
$tb.removeClass("water");
}
});
Similarly when the user moves focus to a different control without entering a value in the textbox, we add the watermark css again.
$(".water").blur(function() {
$tb = $(this);
if ($.trim($tb.val()) == "") {
$tb.val(this.title);
$tb.addClass("water");
}
});
The water class declared in Demos.css looks like this:
.water
{
font-family: Tahoma, Arial, sans-serif;
font-size:75%;
color:gray;
}
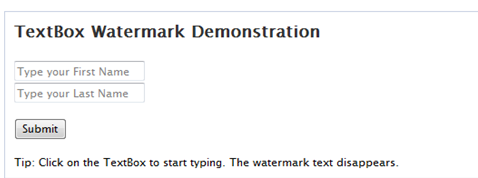
When the page loads for the first time, the watermark is visible as shown here:
When the user enters the First/Last Name and submits the form, the watermark behavior is no more needed to be displayed. This is achieved by comparing the ‘title’ with the ‘value’ of the textbox. If the ‘value’ does not match the ‘title’, this indicates that the user has entered some value in the textboxes and submitted the form. So in this case we remove the watermark appearance.
$(".water").each(function() {
$tb = $(this);
if ($tb.val() != this.title) {
$tb.removeClass("water");
}
});
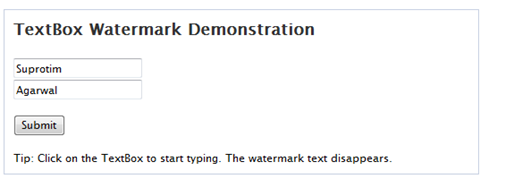
After the user enters the details and submits the form, the result is similar to the one shown here, without the watermark:
Thanks to Arnold Matusz for sharing the tip about the tooltip property. The code has been tested on IE 7, IE 8, Firefox 3, Chrome 2, Safari 4 browsers
You can see a Live Demo over here
I hope you found this article useful and I thank you for viewing it. This article was taken from my EBook called 51 Tips, Tricks and Recipes with jQuery and ASP.NET Controls which contains similar recipes that you can use in your applications.
No comments:
Post a Comment