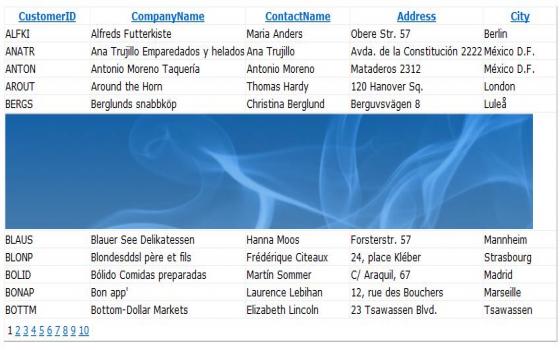
At times, you need to perform these custom routines, to add your own data, when the data is being bound to a GridView control. In this article, we will explore how to insert image or text in between the rows of a GridView. We will also see how we can create new rows on the fly and attach them to the GridView control at runtime. Follow these steps:
Step 1: Create a new ASP.NET website. Drag and drop a SqlDataSource Control to the page and use the wizard to connect to the Northwind database. Select the CustomerId, CompanyName, ContactName, Address and City from the Customers table. The wizard will also prompt you to save the connection string in the web.config file. Choose to do so. The design code will look similar to the following:
<asp:SqlDataSource ID="SqlDataSource1" runat="server" ConnectionString="<%$ ConnectionStrings:NorthwindConnectionString %>"
SelectCommand="SELECT [CustomerID], [CompanyName], [ContactName], [Address], [City] FROM [Customers]">
</asp:SqlDataSource>
An entry will be added to the web.config file as shown below:
<connectionStrings>
<add name="NorthwindConnectionString" connectionString="Data Source=(local);Initial Catalog=Northwind;Integrated Security=True" providerName="System.Data.SqlClient"/>
</connectionStrings>
Step 2: Now add a GridView control to the page and using the smart tag, select the DataSource to be SqlDataSource1 in the GridView tasks panel. Using the same panel, click on the Enable Paging and Enable Sorting checkboxes. The source will look similar to the following.
<asp:GridView ID="GridView1" runat="server" AllowPaging="True" AllowSorting="True"
AutoGenerateColumns="False" DataKeyNames="CustomerID" DataSourceID="SqlDataSource1"
OnRowDataBound="GridView1_RowDataBound" Font-Names="Verdana" Font-Size="Small">
<Columns>
<asp:BoundField DataField="CustomerID" HeaderText="CustomerID" ReadOnly="True" SortExpression="CustomerID" />
<asp:BoundField DataField="CompanyName" HeaderText="CompanyName" SortExpression="CompanyName" />
<asp:BoundField DataField="ContactName" HeaderText="ContactName" SortExpression="ContactName" />
<asp:BoundField DataField="Address" HeaderText="Address" SortExpression="Address" />
<asp:BoundField DataField="City" HeaderText="City" SortExpression="City" />
</Columns>
</asp:GridView>
Step 3: We will now need to think of a way to add our own custom row with the image, in between the existing rows of a GridView. The GridView renders as a table and contains rows and cells. If we could somehow create a cell on the fly, add our image to the cell and then add the cell to the row, we should be able to achieve our requirement. All this needs to be done while the row is being bound to data in the GridView control. Well the event that we will make use of to perform all the action, is the GridView_RowDataBound event. This event enables you to provide an event-handling method that performs a custom routine, such as modifying the values of the data bound to the row, whenever this event occurs. Before that, add a page level variable called pgSize which will hold the row position at which we need to insert the image. Also add an image to your project that is about the same width as that of your GridView. The comments have been marked inside the code to help you understand. The entire code will look similar to the following:
C#
public partial class _Default : System.Web.UI.Page
{
static int pgSize;
protected void Page_Load(object sender, EventArgs e)
{
if(!Page.IsPostBack)
pgSize = 0;
}
protected void GridView1_RowDataBound(object sender, GridViewRowEventArgs e)
{
if (e.Row.RowType == DataControlRowType.DataRow)
{
TableCell tCell = new TableCell();
// create image
Image img = new Image();
img.ImageUrl = "subheader.jpg";
// add the image to the cell
tCell.Controls.Add(img);
GridView gView = (GridView)sender;
// set the colspan to occupy the other cells in the row
int colSpan = gView.Columns.Count;
tCell.Attributes["ColSpan"] = colSpan.ToString();
GridViewRow gRow = new GridViewRow(-1, -1, DataControlRowType.DataRow, DataControlRowState.Normal);
// add the cells to the gridviewrow
gRow.Cells.Add(tCell);
Table tbl = (Table)e.Row.Parent;
// set the pagesize initially to the pagecount/2
// in our case it is 10/2 = 5. So the first image will
// displayed after the 5th row.
if(pgSize == 0)
pgSize = GridView1.PageCount / 2;
// This step is performed so that we can display the image only after every
// 5, 15, 25 ,35 rows and so on ...
// The logic is not perfect but will give you the idea
if (Convert.ToDouble(e.Row.DataItemIndex + 1) / Convert.ToDouble(pgSize) == 1.0)
{
tbl.Controls.AddAt(gView.Controls[0].Controls.Count, gRow);
// add 10 to the pgsize so that the image can be displayed
// at rows 5, 15, 25 and so on..
pgSize = pgSize + 10;
}
}
}
}
VB.NET
Public Partial Class _Default
Inherits System.Web.UI.Page
Private Shared pgSize As Integer
Protected Sub Page_Load(ByVal sender As Object, ByVal e As EventArgs)
If (Not Page.IsPostBack) Then
pgSize = 0
End If
End Sub
Protected Sub GridView1_RowDataBound(ByVal sender As Object, ByVal e As GridViewRowEventArgs)
If e.Row.RowType = DataControlRowType.DataRow Then
Dim tCell As TableCell = New TableCell()
' create image
Dim img As Image = New Image()
img.ImageUrl = "subheader.jpg"
' add the image to the cell
tCell.Controls.Add(img)
Dim gView As GridView = CType(sender, GridView)
' set the colspan to occupy the other cells in the row
Dim colSpan As Integer = gView.Columns.Count
tCell.Attributes("ColSpan") = colSpan.ToString()
Dim gRow As GridViewRow = New GridViewRow(-1, -1, DataControlRowType.DataRow, DataControlRowState.Normal)
' add the cells to the gridviewrow
gRow.Cells.Add(tCell)
Dim tbl As Table = CType(e.Row.Parent, Table)
' set the pagesize initially to the pagecount/2
' in our case it is 10/2 = 5. So the first image will
' displayed after the 5th row.
If pgSize = 0 Then
pgSize = GridView1.PageCount / 2
End If
' This step is performed so that we can display the image only after every
' 5, 15, 25 ,35 rows and so on ...
' The logic is not perfect but will give you the idea
If Convert.ToDouble(e.Row.DataItemIndex + 1) / Convert.ToDouble(pgSize) = 1.0 Then
tbl.Controls.AddAt(gView.Controls(0).Controls.Count, gRow)
' add 10 to the pgsize so that the image can be displayed
' at rows 5, 15, 25 and so on..
pgSize = pgSize + 10
End If
End If
End Sub
End Class
The rendered GridView at the end will look similar to the following

Well I hope this example has given you some insights of the various possibilities of customizing the GridView to suit our requirements. Keep visiting the site as we will explore more of these ‘unusual’ requirements that you could encounter while dealing with the GridView. I hope this article was useful and I thank you for viewing it.
No comments:
Post a Comment