I saw a post recently in the MSDN SSIS forum asking for help to build a package to loop through the rows of a ‘Header’ table. Then for each ‘Header’ row; get rows from ‘Line’ table and then import them into an Excel file, this is, generating a different Excel file for each Header-lines set.
For the sake of simplicity, I decided to divide the solution in two parts. This first part explains how to use a ForEach Loop Container to iterate through a result set retrieved by a query. Then Second part shows how to use Excel Destination to create files dynamically.
Let’s first create the tables and some sample data for our data source
CREATE TABLE [dbo].[Header](
[HeaderID] [int] NULL,
[HeaderName] [nvarchar](50) NULL,
[HeaderEmail] [nvarchar](50) NULL
) ON [PRIMARY]
INSERT INTO [Header] ([HeaderID],[HeaderName],[HeaderEmail])VALUES(1,'ABC','Abc@abc.com')
INSERT INTO [Header] ([HeaderID],[HeaderName],[HeaderEmail])VALUES(2,'CDE','cde@cde.com')
INSERT INTO [Header] ([HeaderID],[HeaderName],[HeaderEmail])VALUES(3,'GHF','ghf@ghf.com')
CREATE TABLE [dbo].[Line](
[LineID] [int] NULL,
[HeaderID] [int] NULL,
[LineName] [nvarchar](25) NULL,
[LineDetails] [nvarchar](50) NULL
) ON [PRIMARY]
INSERT INTO [line] ([LineID],[HeaderID],[LineName],[LineDetails])VALUES(1,1,'Line1','xxxx')
INSERT INTO [line] ([LineID],[HeaderID],[LineName],[LineDetails])VALUES(2,1,'Line2','yyyy')
INSERT INTO [line] ([LineID],[HeaderID],[LineName],[LineDetails])VALUES(3,1,'Line3','zzzz')
INSERT INTO [line] ([LineID],[HeaderID],[LineName],[LineDetails])VALUES(4,2,'Line1','ttttt')
INSERT INTO [line] ([LineID],[HeaderID],[LineName],[LineDetails])VALUES(5,2,'Line2','ggggg')
INSERT INTO [line] ([LineID],[HeaderID],[LineName],[LineDetails])VALUES(6,3,'Line1','jjjjjjjjj')
The Package stuff
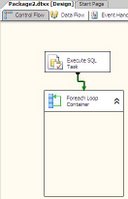
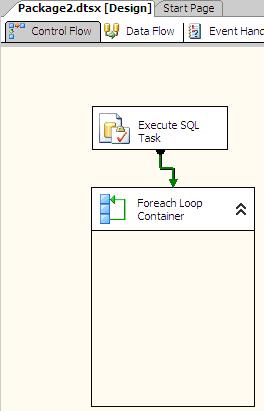
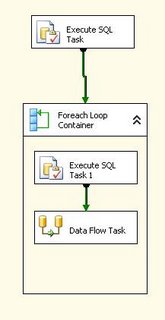
In an empty package, add a Execute SQL Task and a ForeachLoop Container. The Execute SQL Task is used to get the ‘Header’ set of rows that will drive the ForEach loop container.
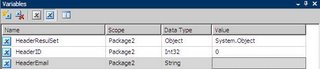
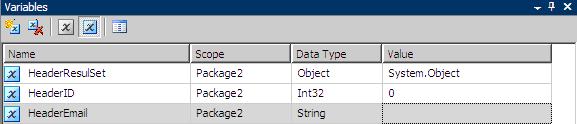
Then create a SSIS variable of ‘Object’ type to hold the result set from the Execute SQL Task, in this example I called it ‘HeaderResultSet’. Also create one variable for each column in the ‘Header’ result set you are planning to use. In this case I have added one for the HeaderId and other for the HeaderEmail column.
Open the Execute SQL Task and write the SQL Statement to query the Header table, change the ‘ResultSet’ property to ‘Full Result Set’. The connection property obviously has to point to the database where you created the sample tables, therefore make sure you create a connection manager for that.

This is the query I eneterd:


 At this point, you should be able to execute the package and get all the rows into a single Excel file; which is half of our ultimate goal.
In the Excel file connection manager, let's create another expression that uses the 'ExcelFileName' variable to change the ExcelFilePath. To do so, click in the connection manager, go to the properties window and click in the expression property. Once the Property Expression Editor is available; choose ExcelFilePath and bring the expression builder. Write an expression like:
For the sake of simplicity, I decided to divide the solution in two parts. This first part explains how to use a ForEach Loop Container to iterate through a result set retrieved by a query. Then Second part shows how to use Excel Destination to create files dynamically.
Let’s first create the tables and some sample data for our data source
CREATE TABLE [dbo].[Header](
[HeaderID] [int] NULL,
[HeaderName] [nvarchar](50) NULL,
[HeaderEmail] [nvarchar](50) NULL
) ON [PRIMARY]
INSERT INTO [Header] ([HeaderID],[HeaderName],[HeaderEmail])VALUES(1,'ABC','Abc@abc.com')
INSERT INTO [Header] ([HeaderID],[HeaderName],[HeaderEmail])VALUES(2,'CDE','cde@cde.com')
INSERT INTO [Header] ([HeaderID],[HeaderName],[HeaderEmail])VALUES(3,'GHF','ghf@ghf.com')
CREATE TABLE [dbo].[Line](
[LineID] [int] NULL,
[HeaderID] [int] NULL,
[LineName] [nvarchar](25) NULL,
[LineDetails] [nvarchar](50) NULL
) ON [PRIMARY]
INSERT INTO [line] ([LineID],[HeaderID],[LineName],[LineDetails])VALUES(1,1,'Line1','xxxx')
INSERT INTO [line] ([LineID],[HeaderID],[LineName],[LineDetails])VALUES(2,1,'Line2','yyyy')
INSERT INTO [line] ([LineID],[HeaderID],[LineName],[LineDetails])VALUES(3,1,'Line3','zzzz')
INSERT INTO [line] ([LineID],[HeaderID],[LineName],[LineDetails])VALUES(4,2,'Line1','ttttt')
INSERT INTO [line] ([LineID],[HeaderID],[LineName],[LineDetails])VALUES(5,2,'Line2','ggggg')
INSERT INTO [line] ([LineID],[HeaderID],[LineName],[LineDetails])VALUES(6,3,'Line1','jjjjjjjjj')
The Package stuff
In an empty package, add a Execute SQL Task and a ForeachLoop Container. The Execute SQL Task is used to get the ‘Header’ set of rows that will drive the ForEach loop container.
Then create a SSIS variable of ‘Object’ type to hold the result set from the Execute SQL Task, in this example I called it ‘HeaderResultSet’. Also create one variable for each column in the ‘Header’ result set you are planning to use. In this case I have added one for the HeaderId and other for the HeaderEmail column.
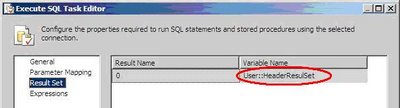
Open the Execute SQL Task and write the SQL Statement to query the Header table, change the ‘ResultSet’ property to ‘Full Result Set’. The connection property obviously has to point to the database where you created the sample tables, therefore make sure you create a connection manager for that.
In the ResultSet tab, select the variable that will hold the query result and click OK.
This is the query I eneterd:
Select HeaderID, headerEmail
From dbo.Header
So far, we have configured the Execute SQL Task to retrieve a set of rows from the ‘Header’ table and place the result into a SSIS variable called ‘HeaderResultSet’.
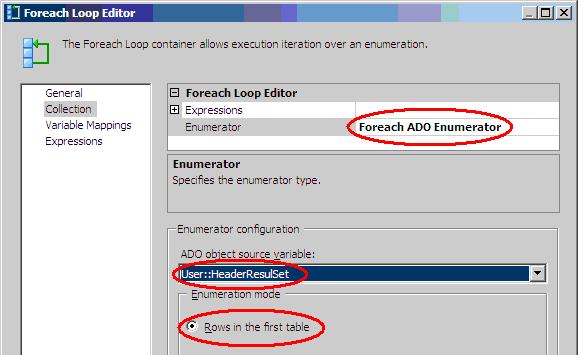
Now, the ForEachLoop container. Go to the collection page and make the selections as shown bellow:
From dbo.Header
So far, we have configured the Execute SQL Task to retrieve a set of rows from the ‘Header’ table and place the result into a SSIS variable called ‘HeaderResultSet’.
Now, the ForEachLoop container. Go to the collection page and make the selections as shown bellow:

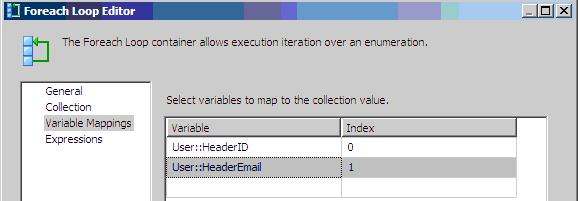
Next, go to the variable mapping tab and create a mapping for each column in you result set; in this case the HeaderID and the HeaderEmail
Now, add a DataFlow task inside of the ForEachLoop.
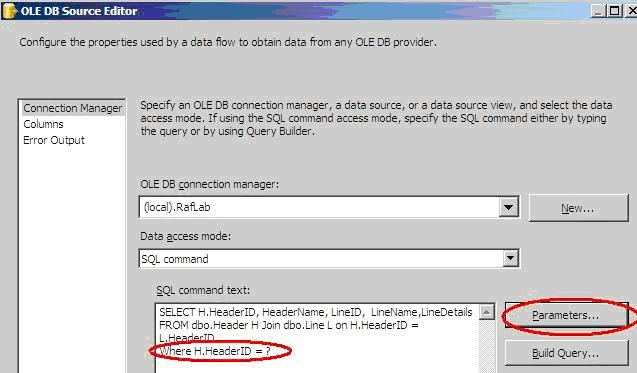
Inside of the dataflow task, add an OLE DB Source. This Source component will use a parameterized query to get the ‘line’ rows of each ‘Header’. Use the same connection manager you used in the Execute SQL Task, choose SQlCommand as data access mode an write a query like:
SELECT H.HeaderID, HeaderName, LineID, LineName,LineDetails
FROM dbo.Header H Join dbo.Line L on H.HeaderID = L.HeaderID
WHERE H.HeaderID = ?
SELECT H.HeaderID, HeaderName, LineID, LineName,LineDetails
FROM dbo.Header H Join dbo.Line L on H.HeaderID = L.HeaderID
WHERE H.HeaderID = ?
Once the query is in place, it is time to map its parameter. Click in the parameters button and create the required mapping. In this case, the variable HeaderID, that is populated by the ForEachLoop container, is mapped to the HeaderID column in the WHERE clause of the query. Click OK when you finish.
Now, back to the data flow, add an Excel Destination component and connect the OLE DB Source output to it.
Then, open the Excel destination and create the connection manager and the excel sheet using the new buttons. For this example, the default selections should work just fine. Notice that when you use the new button to create the Excel Sheet a create table statement is issued against the Excel workbook to actually create a sheet. This would be used again when building the logic to make a ‘Dynamic’ Excel destination.
Then, open the Excel destination and create the connection manager and the excel sheet using the new buttons. For this example, the default selections should work just fine. Notice that when you use the new button to create the Excel Sheet a create table statement is issued against the Excel workbook to actually create a sheet. This would be used again when building the logic to make a ‘Dynamic’ Excel destination.
By now, the data flow should look like:
At this point, you should be able to execute the package and get all the rows into a single Excel file; which is half of our ultimate goal.
I will basically use an Execute SQL Task with an Excel Connection manger to create a excel file with a different name on every iteration. The connection manger uses an expression in ExcelFilePath to make the file name distinct each time.
Ok, no more talking and let’s get to work!
Add an Execute SQL Task inside of the ForEach Loop Container and create a precedence constraint (yes, a green arrow!) from the Execute SQL Task to the Dataflow task.
Open the Execute SQL task and change the ConnectionType to ‘Excel’, Choose the Excel Connection Manager in Connection property and write a Create table statement in the SQLStatement as follows:
CREATE TABLE `Excel Destination` (
`HeaderID` INTEGER,
`HeaderName` NVARCHAR(50),
`LineID` INTEGER,
`LineName` NVARCHAR(50),
`LineDetails` NVARCHAR(50)
)
As you can see, the objective of this EST is to create the excel file to make it available to the data flow task on every iteration; and it is here where the power of the expression come handy.
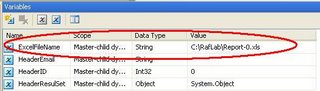
Create a new variable, to hold the file name to be creates. I created a variable called 'ExcelFileName' of String Type (give an intial name in the variable window to avoid validation errors).
Ok, no more talking and let’s get to work!
Add an Execute SQL Task inside of the ForEach Loop Container and create a precedence constraint (yes, a green arrow!) from the Execute SQL Task to the Dataflow task.

Open the Execute SQL task and change the ConnectionType to ‘Excel’, Choose the Excel Connection Manager in Connection property and write a Create table statement in the SQLStatement as follows:
CREATE TABLE `Excel Destination` (
`HeaderID` INTEGER,
`HeaderName` NVARCHAR(50),
`LineID` INTEGER,
`LineName` NVARCHAR(50),
`LineDetails` NVARCHAR(50)
)
As you can see, the objective of this EST is to create the excel file to make it available to the data flow task on every iteration; and it is here where the power of the expression come handy.
Create a new variable, to hold the file name to be creates. I created a variable called 'ExcelFileName' of String Type (give an intial name in the variable window to avoid validation errors).
Now, use an expression to change the value of the variable at run time; to do so, go to the preperties windows of the Variable and change the porperty EvaluateAsExpression to true and click on the expression property to bring the expression editor. That expression will change the value of the variable as the package iterates through the recordset. I used an expression like:
"C:\\Temp\\Report-"+ (DT_STR, 25,1252)@[User::HeaderID] +".xls"
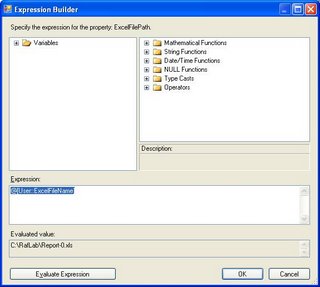
In the Excel file connection manager, let's create another expression that uses the 'ExcelFileName' variable to change the ExcelFilePath. To do so, click in the connection manager, go to the properties window and click in the expression property. Once the Property Expression Editor is available; choose ExcelFilePath and bring the expression builder. Write an expression like:
@[User::ExcelFileName]
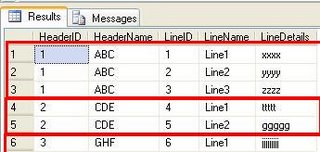
Now, cross the fingers, run the package and hopefully you will get 3 excel files with following data (rows in each red box will go to a diffrent file)
No comments:
Post a Comment