Scenario
You have built an ASP.NET Web Application using Visual Studio 2005, and want to enable customers to automatically install and deploy it on servers via an easy setup program.
Specifically, you want to create a standard Windows setup program that will create and configure the application on IIS, copy all of the application’s files to the appropriate location on the server, and ensure that ASP.NET 2.0 is correctly mapped to run the application. You also want the setup program to prompt the customer for the database location that the new application should use, and have the setup program automatically update the web.config file with the database connectionstring settings the customer provided.
One solution to consider using is the built-in "Web Setup Project" support that is built-in to Visual Studio 2005. Web Setup Projects can be used to pipe the compilation outputs from VS 2005 Web Application Projects as well as Web Site Projects (when used with VS 2005 Web Deployment Projects), to create encapsulated Windows setup programs. The below walkthrough demonstrates step-by-step how to create and use one.
1) Create a VS 2005 Web Application Project
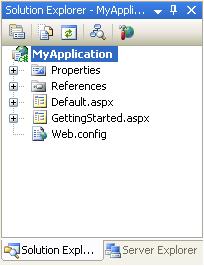
To begin with, we’ll start with an empty instance of Visual Studio and create a new VS 2005 Web Application project (select File->New Project->ASP.NET Web Application). For the purposes of this simple sample we’ll have two pages in the project:
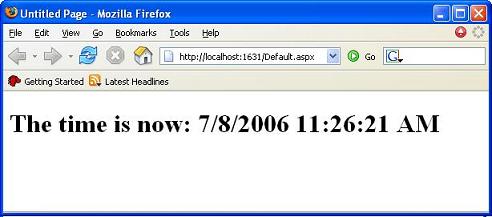
We’ll add a label to the Default.aspx page and a Page_Load event handler in the code-behind to output the current timestamp on each request. When I press F5 to build and run the application, the project will compile and run as I’d expect (and by default use the built-in VS Web Server):
2) Add a VS 2005 Web Setup Project to the Solution
Now that we have a simple ASP.NET application built, we’ll want to add a VS 2005 Web Setup Project to the solution. Choose the File->Add->New Project menu item to add one into your solution:
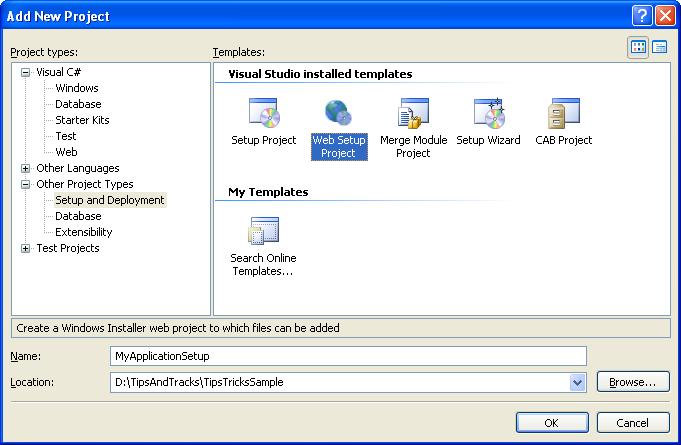
Note that the “Web Setup Project” type shows up under the “Other Project Types->Setup and Deployment” node in the New Project dialog above. Name it whatever you want and hit ok. It will then show up in your solution explorer as a separate project.
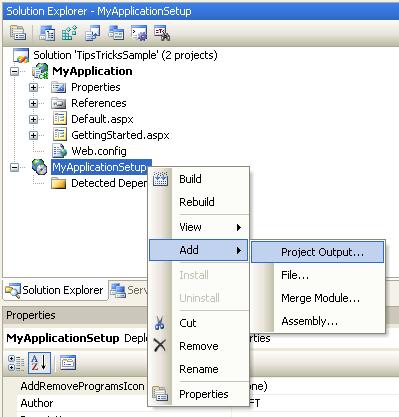
Our next step will be to configure the web setup project to take the compiled assemblies (\bin directory contents) + content markup (.aspx, .config, etc files) from our Web Application Project and use them as inputs within our setup project. To-do this, right-click on the web setup project node in the solution explorer and choose the “Add->Project Output” context menu item:
A dialog will then appear allowing us to select which project in the solution, and which of its project contents, we want to add to the setup package:
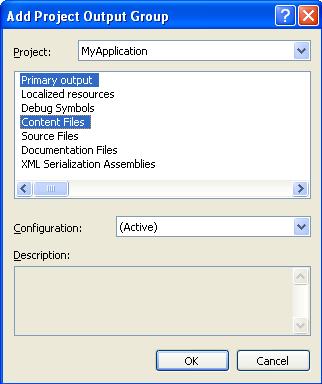
For ASP.NET Web Application Projects it is really important that we select both the “Primary Output” (which are the compiled assemblies for the \bin directory) as well as the “Content Files” (which are the .aspx markup files) within this dialog.
By default, the web setup project will copy both of these items into the root of the target Web Application Folder that the setup project will create. You can see that it is configured this way by opening up the “File System” view within the web setup project (right click on the web setup project root and choose View->File System):
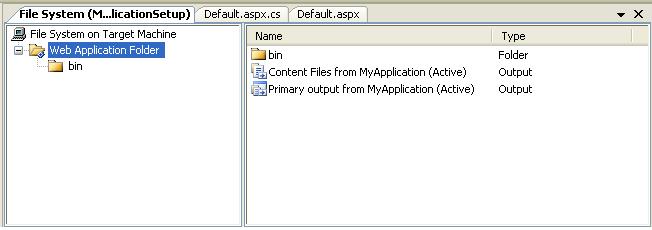
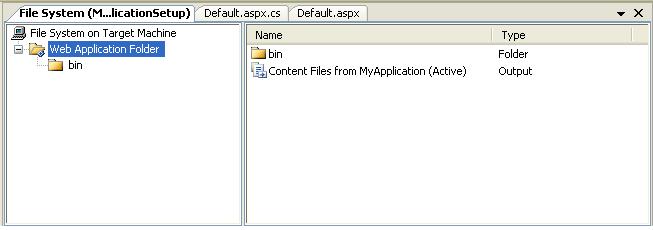
This actually isn’t what we want to have happen though – since we really want the assemblies (indicated by the Primary Output node) to be copied into the application’s \bin directory instead (otherwise ASP.NET won’t be able to find them at runtime). To fix this, drag/drop the “Primary Output from MyApplication” node into the \bin directory. Once this is done you should be able to click on the “Web Application Folder” node on the left-hand side and see this:
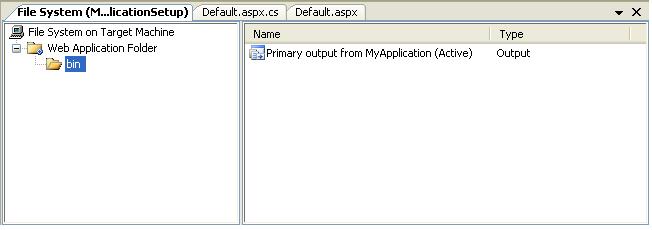
And then click on the “bin” folder sub-node and see this:
We now have a basic web setup project created and configured for our ASP.NET Web Application. Next step is to build and run it.
3) Build and Run the VS 2005 Web Setup Project to the Solution
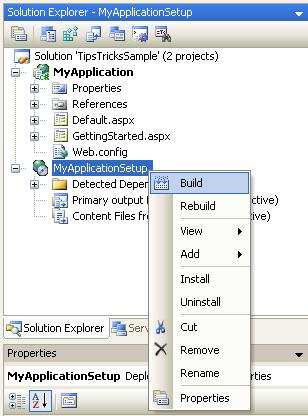
To build the web-setup project we can right-click on the web setup project node within the solution explorer and choose the “Build” option:
If you open the output window within VS (View->Output menu item), you will see the results of this build operation:
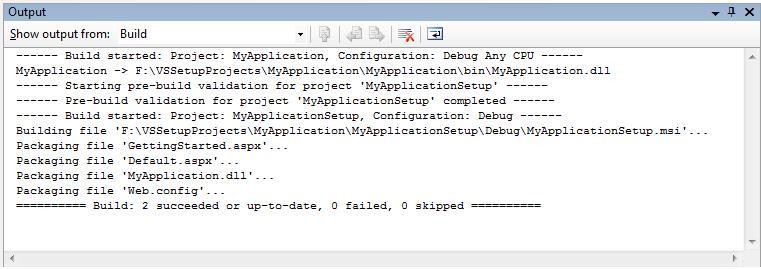
Our “MyApplicationSetup” project created a new MyApplicationSetup.msi Windows installer file and compressed and packaged the contents of our ASP.NET Web Application (note: in the web setup project properties dialog you can choose whether the compression algorithm used is optimized for size or speed).
Very Important: Because setup projects take awhile to build, they are by default marked not to build as part of the solution. What this means is that you need to right-click on them and explicitly do a build in order for them to be recompiled. Be careful to-do this when you make and test changes - otherwise you'll be running the previously compiled version and not the one with your latest code!
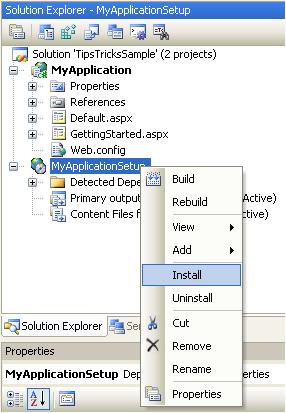
To test it, we can right-click on the web setup project within the solution explorer and choose the “Install” option to install it (or alternatively launch it outside of VS by running it):
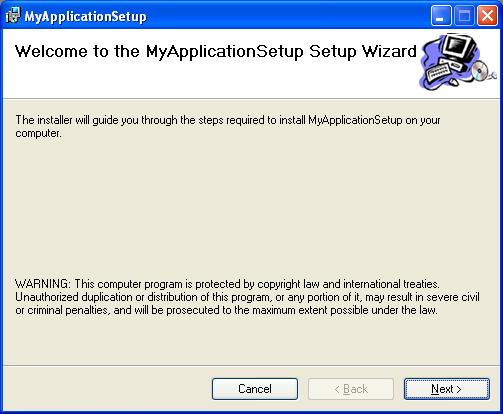
This will launch a standard Windows installer and walk the user through installing the application on IIS:
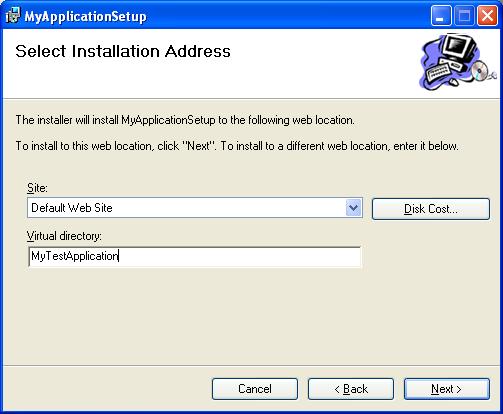
VS 2005’s web setup projects allow you to pick which site to install the application on if multiple sites are configured on IIS (this wasn’t supported with the VS 2003 version). You can optionally specify an application virtual-directory path to use (for example: http://www.myserver.com/myapppath), or you can leave this value blank to install it as the root application on the site (for example: http://www.myserver.com/).
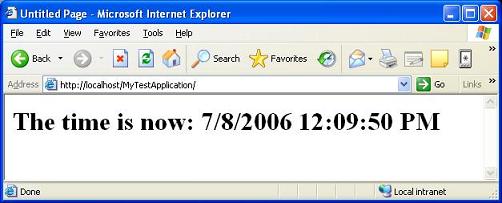
Once the installer completes, the application will have been copied to disk and registered with IIS. We can now run the application using the HTTP path we provided during installation like so:
Once installed the application will also show up in the standard “Add or Remove Programs” utility within the Windows Control Panel:
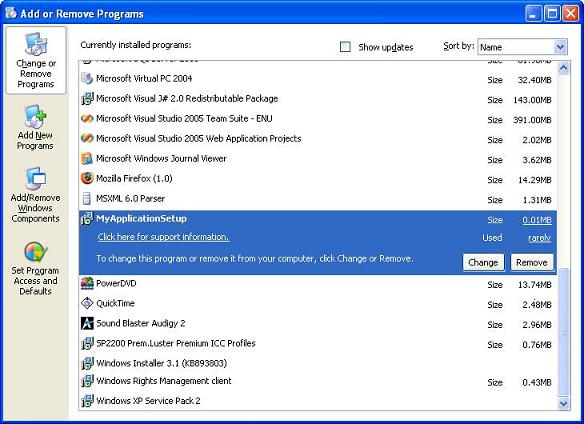
You can remove the application either by running uninstall from the control panel utility, or (at development time) by right-clicking on the web setup project node within the VS Solution Explorer and selecting the “Uninstall” menu item. This will cause all installed files to be removed from disk.
4) Update the Wizard UI of the Web Setup Project
By default the Windows installer created by a web setup project has some default instruction strings and banner images for the setup:
You can change this and customize the screens by right-clicking on the web setup project node in the VS solution explorer and selecting the "View->User Interface" context menu item):
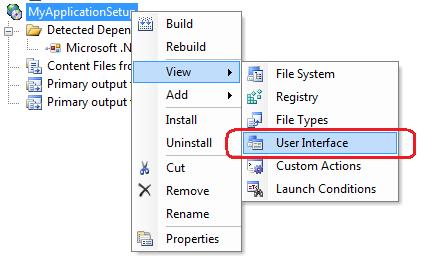
This will then bring up a screen that shows the list of screens to be displayed during setup:
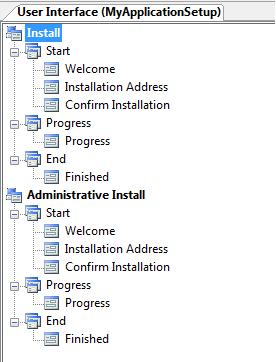
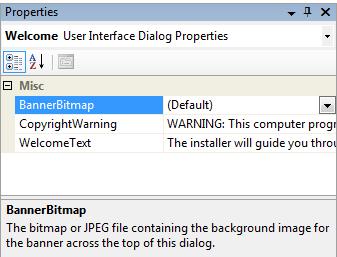
Unfortunately there isn't a forms-designer that you can use to override the screens above. However, you can select a screen, and then go to the property grid to customize its text and change the graphics used within the screen:
You can also create new screens and add them into the setup wizard. Later in this tutorial we'll use this feature to create a custom screen to collect database connection-string information and use it to automate configuring our web.config file to point at the appropriate database.
5) Adding Custom Actions to the VS 2005 Web Setup Project
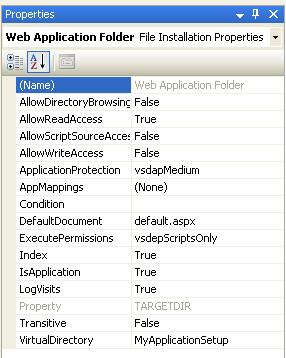
Web Setup Projects contain built-in support for configuring and performing common setup actions. These include editors for adding/changing registry entries (choose View->Register to configure), changing file-type associations (View->File Types), and for validating prerequisite components are already installed (it automatically checks that the .NET Framework 2.0 redist is installed). Setup Projects also allow you to configure a number of common IIS settings declaratively (click on the “Web Application Folder” in the File System view and then look at the property grid to see these):
But for non-trivial setups you are likely to want to be able to execute your own custom code during setup to customize things. The good news is that web setup projects support this with something called “Custom Actions” – which is code you write that can execute during both install and uninstall operations.
To add a custom action you first want to add a new class library project to your solution (File->Add->New Project->Class Library).
You then want to add assembly references in this newly created Class Library to the System.Configuration.Install.dll, System.Configuration.dll, System.Diagnostics.dll, and System.Web.dll assemblies. You’ll then want to create a new class for your custom action and have it derive from the “System.Configuration.Install.Installer” base class like so:
using System;
using System.Configuration.Install;
using System.ComponentModel;
namespace MyCustomAction
{
[RunInstaller(true)]
public class ScottSetupAction : Installer
{
public override void Install(System.Collections.IDictionary stateSaver)
{
base.Install(stateSaver);
// Todo: Write Your Custom Install Logic Here
}
}
}
Notice the custom “RunInstaller(true)” attribute that must be set on the class name. This is important and required (and easy to forget!). You’ll need to add a using statement to the System.ComponentModel namespace to avoid fully qualifying this.
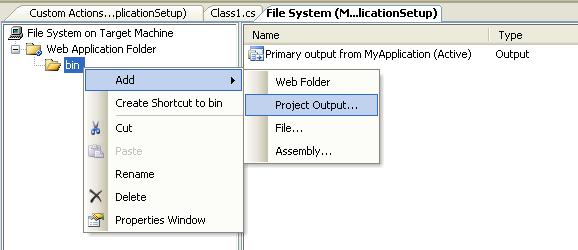
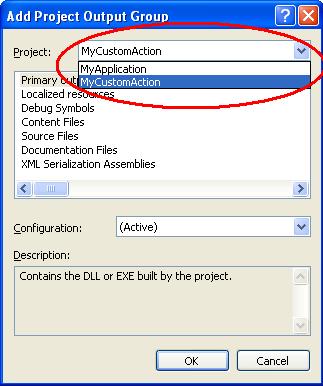
Next we’ll need to make sure this Custom Action assembly gets added to our web setup project. To-do this, right-click on the Web Setup Project root node in the solution explorer and select the View->File System menu item to bring up the file-system editor. Right-click on the “bin” sub-folder and choose “Add->Project Output” like we did earlier to get the custom action assembly added to the web setup project:
In this case we’ll want to select the Custom Action Class Library project instead of our web application one. Pick it from the project drop-down at the top of the dialog and then select the “Primary Output” option as the piece we want to add to the web-setup project (this will cause the Custom Action assembly to get added):
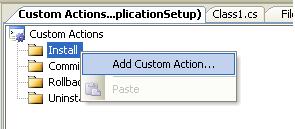
Lastly, we’ll configure the web-setup project to call our custom action assembly during the install phase of setup. To do this we’ll right-click on the web setup project root node in the solution explorer and choose the “View->Custom Actions” menu item. This will then bring up the Custom Actions Editor. Right-click on the “Install” node and choose “Add Custom Action”:
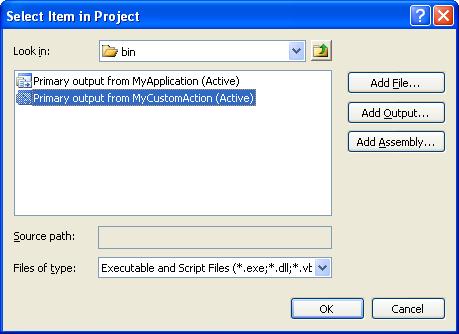
Drill into the Web Application Folder and Bin directory and choose the output from our Custom Action we imported:
The Setup Project will then automatically detect the custom action because of the “RunInstaller” attribute:
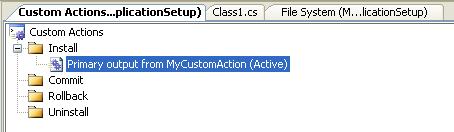
Our custom action class and Install method will now run anytime we run the installation setup program.
6) Useful Custom Action Example: ASP.NET Script Mapping Checker
The previous section showed how to create and configure an empty custom action class and install method. Let’s now do something useful with it. Specifically, let’s add code to verify that the right version of ASP.NET is correctly mapped for the application we are creating.
Because ASP.NET V1.1 and V2.0 can run side-by-side with each other on the same machine, it is possible to have different parts of a web server configured to run using different versions of ASP.NET. By default, the versions inherit hierarchically – meaning if the root application on a site is configured to still run using ASP.NET V1.1, a newly created application underneath the site root will by default run using V1.1 as well. What we’ll do in the steps below is write some code to ensure that our new application always runs using ASP.NET 2.0.
To begin with, we’ll select our custom action within the Custom Action explorer (just like in the previous screenshot above - using the View->Custom Action context menu item). We’ll then go to the property grid and specify a few parameters to pass to our custom action to use:
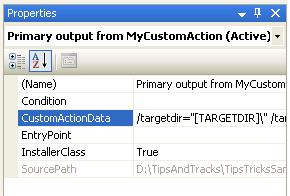
Specifically, we’ll pass in the target directory that the application is being installed in, the IIS site map path, and the IIS virtual directory name that the user specified in the setup wizard. This string of values looks like this:
/targetdir="[TARGETDIR]\" /targetvdir="[TARGETVDIR]" /targetsite="[TARGETSITE]"
We’ll then update our custom action to access these values and do something with them like so:
using System;
using System.Configuration;
using System.Configuration.Install;
using System.ComponentModel;
using System.Diagnostics;
using System.IO;
namespace MyCustomAction
{
[RunInstaller(true)]
public class ScottSetupAction : Installer
{
public override void Install(System.Collections.IDictionary stateSaver)
{
base.Install(stateSaver);
// Retrieve configuration settings
string targetSite = Context.Parameters["targetsite"];
string targetVDir = Context.Parameters["targetvdir"];
string targetDirectory = Context.Parameters["targetdir"];
if (targetSite == null)
throw new InstallException("IIS Site Name Not Specified!");
if (targetSite.StartsWith("/LM/"))
targetSite = targetSite.Substring(4);
RegisterScriptMaps(targetSite, targetVDir);
}
void RegisterScriptMaps(string targetSite, string targetVDir)
{
// Calculate Windows path
string sysRoot = System.Environment.GetEnvironmentVariable("SystemRoot");
// Launch aspnet_regiis.exe utility to configure mappings
ProcessStartInfo info = new ProcessStartInfo();
info.FileName = Path.Combine(sysRoot, @"Microsoft.NET\Framework\v2.0.50727\aspnet_regiis.exe");
info.Arguments = string.Format("-s {0}/ROOT/{1}", targetSite, targetVDir);
info.CreateNoWindow = true;
info.UseShellExecute = false;
Process.Start(info);
}
}
}
The above code launches the aspnet_regiis.exe utility that ships with ASP.NET within the \Windows\Microsoft.net\framework\v2.0.5.0727\ directory, and passes in the path location information for the site that the web setup installer previously created, along with the “-s” flag – which indicates that the IIS script-maps for that application should be updated to specifically use the ASP.NET 2.0 version, and not inherit the version number from any parent applications.
A special thanks to John for figuring this out in his blog post here.
Note: If you are using IIS6 or IIS7, you'll probably want to also add some logic into the custom action to ensure that the application pool that the application is being hosted in is also mapped to use ASP.NET 2.0. Either that or you'll want to tell the admin to manually check the application pool settings after the setup is complete.
7) Useful Custom Action Example: Configuring Database Connection String
For our next custom action example, let’s add some UI to the setup that allows a user to configure the connection string details of a database the application should use.
Right click on the web setup project and open up the user interface screens again:
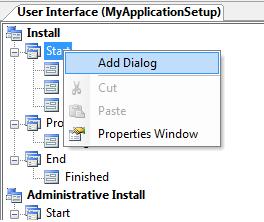
Right click on the "Install" node on the user interface screens page and chose to add a new dialog to the install wizard:
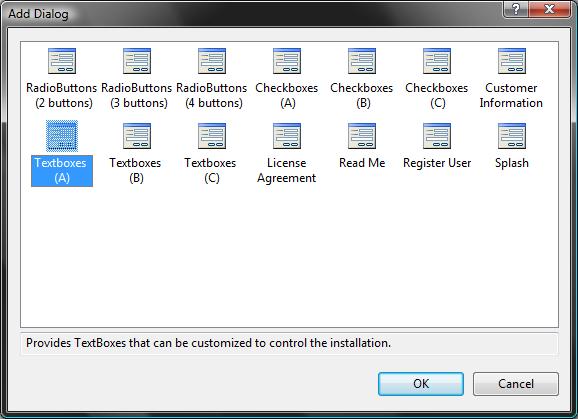
Chose one of the TextBox screens to use for gathering connection string details from the user:
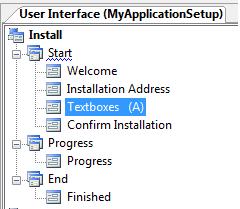
Right-click on the TextBox screen node and move it up to be earlier in the wizard (right after we pick the IIS site and application name to use):
Then click on the TextBox screen and access its property window. Via the property window you can change the text displayed on the screen, as well as control how many textboxes are visible:
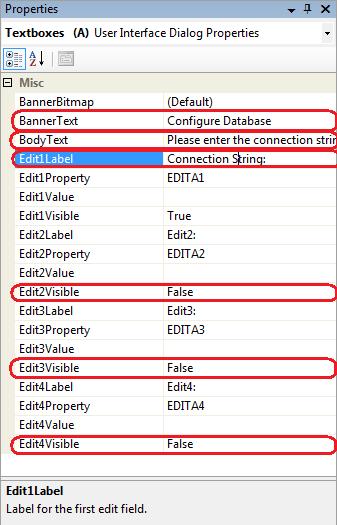
Note in the above property window how I've set the Edit2, Edit3 and Edit4 text boxes to not be visible. Now when we build and run the setup package we'll see this dialog in our wizard steps:

Now that we have UI to capture the connection-string value entered by a user in the wizard, we want to make sure it is passed to our custom action class. You can do this by right-clicking on the web setup project node and by then choosing the "View->Custom Actions" context menu and then opening the property page window of our custom action:
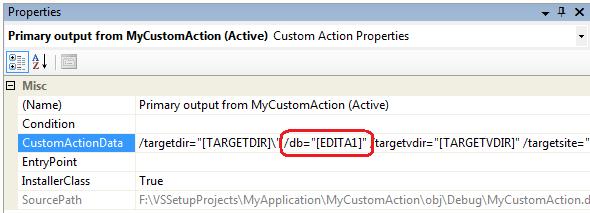
We'll want to update the CustomActionData property value and pass in the connection-string of the database to use (we'll pass in the value from the EDITA1 textbox in the user interface screen):
/targetdir="[TARGETDIR]\" /db="[EDITA1]" /targetvdir="[TARGETVDIR]" /targetsite="[TARGETSITE]"
We can then update our custom action class to retrieve and use this connectionstring value to update the web.config file of the new application to contain the value the user installing the application entered. Below is a method that opens the web.config file for our new application and programmatically updates it with the user entered connection string:
void ConfigureDatabase(string targetSite, string targetVDir, string connectionString)
{
// Retrieve "Friendly Site Name" from IIS for TargetSite
DirectoryEntry entry = new DirectoryEntry("IIS://LocalHost/" + targetSite);
string friendlySiteName = entry.Properties["ServerComment"].Value.ToString();
// Open Application's Web.Config
Configuration config = WebConfigurationManager.OpenWebConfiguration("/" + targetVDir, friendlySiteName);
// Add new connection string setting for web.config
ConnectionStringSettings appDatabase = new ConnectionStringSettings();
appDatabase.Name = DATABASE_CONNECTION_KEY;
appDatabase.ConnectionString = connectionString;
config.ConnectionStrings.ConnectionStrings.Clear();
config.ConnectionStrings.ConnectionStrings.Add(appDatabase);
// Persist web.config settings
config.Save();}
And now after we run the setup program our newly installed ASP.NET application's web.config file will have been updated to point to the right database.
To learn more about how the ASP.NET configuration APIs can be used to make changes to web.config files, please check out the management API section in the ASP.NET 2.0 Quickstart tutorials. Chris Crowe also has some useful samples that demonstrate how to use the System.DirectoryServices APIs to query IIS settings (I needed them to figure out how to lookup the "friendly name" of the site from IIS to open up the web.config file).
You might also want to check out this MSDN documentation sample that demonstrates how to programmatically create a new database (complete with schema and data) with a custom action. You could combine the approach in the MSDN article with the configuration one I used above to completely automate database deployment as part of your setup.
Summary
Hopefully the above tutorial helps demonstrate how to get started with using the built-in web setup project support within Visual Studio. Click here to download a complete version of the sample I built above.
Web setup projects aren't perfect for all scenarios, and I'd primarily recommend them only for cases where you want a packaged GUI setup program (for example: to give to an external customer or to make available as a download on a web-site). If you are instead working on maintaining/managing a site that you have direct access to, I'd probably instead recommend using the "Publish Application" feature available with VS 2005 Web Application Projects (for simple updates), or recommend authoring a PowerShell script to automate updates to the remote server. For an example of a really advanced Powershell script thatwww.pageflakes.com uses to update their site, check out Omar's article here.
One downside with the VS 2005 Web Setup Project support is that you can only build web setup projects from within the IDE - which means you can't completely automate the creation of .MSIs as part of an automated MSBuild process. If this is a showstopper for you, you should consider looking at the WIX setup framework- which does support this scenario.
You can find a good set of WIX Tutorials here. If someone wants to publish a blog post that demonstrates how to perform the scenarios I outlined in the blog post above using WIX, let me know and I will definitely link to it (and send you a few .NET books to say thanks!).
Hope this helps,
No comments:
Post a Comment