Introduction
Creating an install MSI file is rather simple; however there is very little documentation about it, or it's choppy and sometimes too wordy. Well, the point of this article is to show you how to create the installer application, and how to make it launch your application after it has finished installing.
Using the Code
The first thing you must do is add a new reference to your main project file.
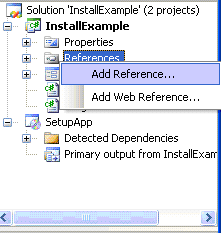
Add
System.Configuration.Install to your project, for some reason this has not been added automatically.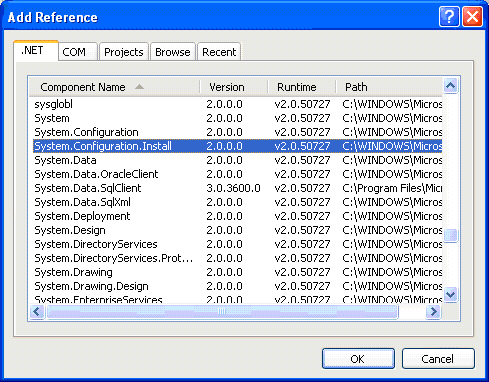
Now you must add an installer class to your main project. To do this, right click on that project, go to Add, and go to New Item…
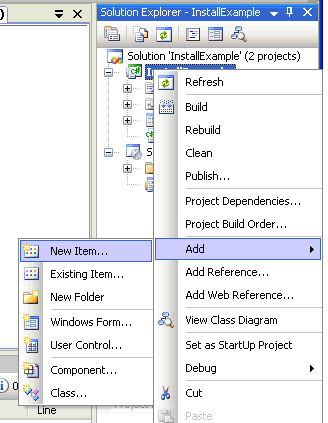
Name it Installer Class.

Copy and paste the following code into your application. Be sure to change the application name to that of your main project, in my case it is InstallSample.exe.
VB.NET
Imports System
Imports System.Diagnostics
Imports System.Windows.Forms
Imports System.Collections
Imports System.ComponentModel
Imports System.Configuration.Install
Imports System.Reflection
Imports System.IO

Namespace OffLine.Installer
    ' Taken from:http://msdn2.microsoft.com/en-us/library/
    ' system.configuration.configurationmanager.aspx
    ' Set 'RunInstaller' attribute to true.

    <RunInstaller(True)> _
    Public Class InstallerClass
        Inherits System.Configuration.Install.Installer
        Public Sub New()
            MyBase.New()
            AddHandler Me.Committed, AddressOf MyInstaller_Committed
                ' Attach the 'Committed' event.
                ' Attach the 'Committing' event.
            AddHandler Me.Committing, AddressOf MyInstaller_Committing
        End Sub

        ' Event handler for 'Committing' event.
        Private Sub MyInstaller_Committing_
  (ByVal sender As Object, ByVal e As InstallEventArgs)
            'Console.WriteLine("");
            'Console.WriteLine("Committing Event occurred.");
            'Console.WriteLine("");
        End Sub

        ' Event handler for 'Committed' event.
        Private Sub MyInstaller_Committed(ByVal sender As Object, _
  ByVal e As InstallEventArgs)
            Try
                Directory.SetCurrentDirectory_
  (Path.GetDirectoryName(Assembly.GetExecutingAssembly().Location))
                Process.Start(Path.GetDirectoryName_
  (Assembly.GetExecutingAssembly().Location) + "\InstallSample.exe")
                    ' Do nothing...
            Catch
            End Try
        End Sub

        ' Override the 'Install' method.
        Public Overloads Overrides Sub Install(ByVal savedState As IDictionary)
            MyBase.Install(savedState)
        End Sub

        ' Override the 'Commit' method.
        Public Overloads Overrides Sub Commit(ByVal savedState As IDictionary)
            MyBase.Commit(savedState)
        End Sub

        ' Override the 'Rollback' method.
        Public Overloads Overrides Sub Rollback(ByVal savedState As IDictionary)
            MyBase.Rollback(savedState)
        End Sub
    End Class
End Namespace
C#.NET
using System;
using System.Diagnostics;
using System.Windows.Forms;
using System.Collections;
using System.ComponentModel;
using System.Configuration.Install;
using System.Reflection;
using System.IO;

namespace OffLine.Installer
{
  // Taken from:http://msdn2.microsoft.com/en-us/library/
  // system.configuration.configurationmanager.aspx
  // Set 'RunInstaller' attribute to true.

  [RunInstaller(true)]
  public class InstallerClass : System.Configuration.Install.Installer
  {
    public InstallerClass()
      : base()
    {
      // Attach the 'Committed' event.
      this.Committed += new InstallEventHandler(MyInstaller_Committed);
      // Attach the 'Committing' event.
      this.Committing += new InstallEventHandler(MyInstaller_Committing);
    }

    // Event handler for 'Committing' event.
    private void MyInstaller_Committing(object sender, InstallEventArgs e)
    {
      //Console.WriteLine("");
      //Console.WriteLine("Committing Event occurred.");
      //Console.WriteLine("");
    }

    // Event handler for 'Committed' event.
    private void MyInstaller_Committed(object sender, InstallEventArgs e)
    {
      try
      {
        Directory.SetCurrentDirectory(Path.GetDirectoryName
  (Assembly.GetExecutingAssembly().Location));
        Process.Start(Path.GetDirectoryName(
          Assembly.GetExecutingAssembly().Location) + "\\InstallSample.exe");
      }
      catch
      {
        // Do nothing...
      }
    }

    // Override the 'Install' method.
    public override void Install(IDictionary savedState)
    {
      base.Install(savedState);
    }

    // Override the 'Commit' method.
    public override void Commit(IDictionary savedState)
    {
      base.Commit(savedState);
    }

    // Override the 'Rollback' method.
    public override void Rollback(IDictionary savedState)
    {
      base.Rollback(savedState);
    }
  }
}
After changing the project EXE file in the source code that you just pasted, be sure to recompile that project.
As you can see from the code, you added a new interface to the class that allows you to take control of the Install, Commit, Committed, and Rollback. In Committed, I am going to launch the InstallSample.exe application.
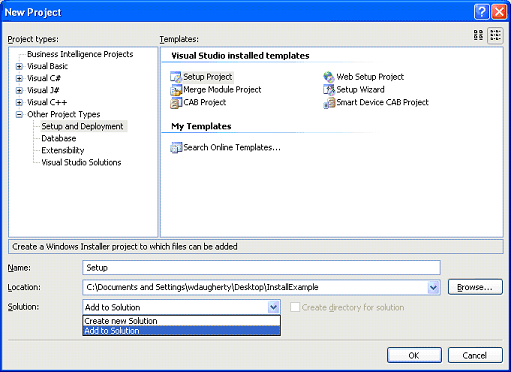
When it is time to create your install project, you will want to add a new Setup Project to your existing applications solution.
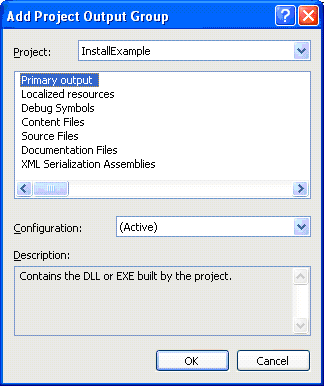
Right click on this new project, then click Add, then go to Project Output…
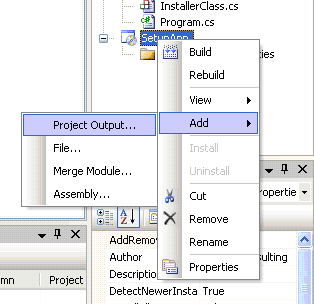
Select Primary Output, then click OK.
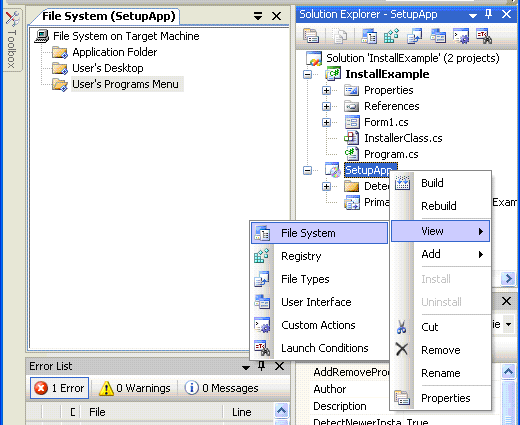
Add a shortcut in the Start Menu… Right click on the Setup Project, then go to View, and then File System…
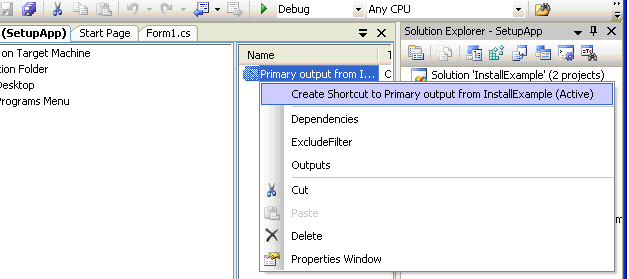
Click on Application Folder, then right click the Primary Output file, and then go to Create Shortcut to Primary Output from InstallExample (Active):
Add a new folder to your start menu, right click on User's Programs Menu, then go to Add, and then Folder. Rename that folder to Installer Example.

Now drag that shortcut you created in the Applications Folder, to the new folder you just created:

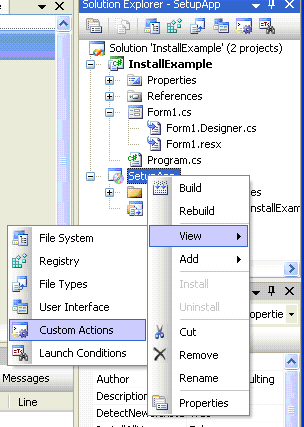
Right click on the new solution; go to View, then Custom Actions:
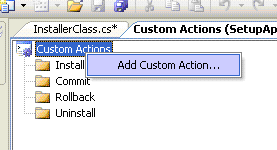
Add a new custom action to the root Custom Actions node:
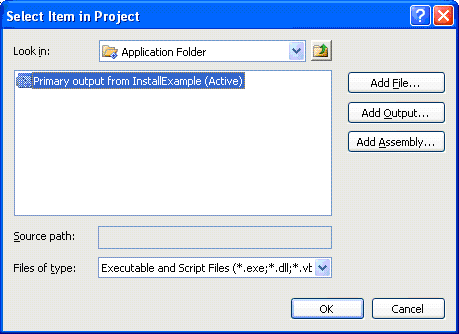
Double click Applications Folder:

Then click Primary output from InstallExample (Active):
Lastly, rebuild your install solution.
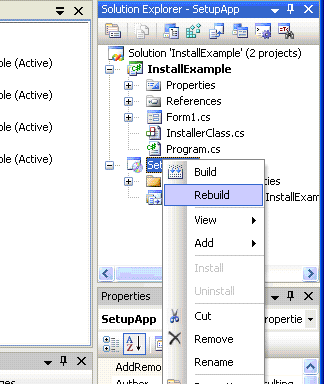
It is a good idea to keep an eye on the status bar, it will tell you when it is done…
Now you can test it and it should install the application. After the install process, it should run automatically.
Reference:
No comments:
Post a Comment