http://www.queness.com/post/1696/create-a-beautiful-looking-custom-dialog-box-with-jquery-and-css3

 This is the html, basically #dialog-overlay is the dark background and #dialog-box is the message box. It's pretty straight forward and I reckon you can use javascript to append this into BODY as well.
Introduction
I've been working on a web application that requires intensive use of AJAX and Javascript. It has a fancy navigation menu (tab menu + lava lamp submenu), tab interface in sidebar, AJAX based calendar and schedule module, AJAX based registration and forgotten password...... it has heaps of scripts in it and it looks pretty good when they all work together.
This custom dialog box is one of the scripts in that website and I think it will be quite useful for all of you as well. The reason I have this custom dialog box is due to the inconsistencies across different browsers. If you look at mac's firefox and windows' firefox, the dialog box is completely different!
One thing about this dialog box, it uses CSS3 drop shawdow and a completely CSS3 skined button. So, latest version of chrome, firefox and safari will have no problems with it, but for IE6 and 7, the script will work but the display of the dialog box will look plain, no rounded border, drop shadow and gradient (i think ie8 will work).
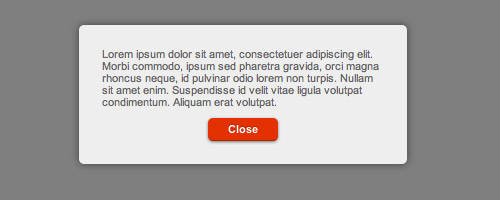
This is how it looks like:

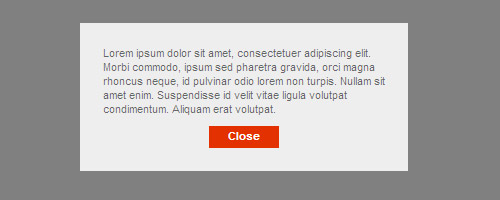
This is how it looks like in IE:
 This is the html, basically #dialog-overlay is the dark background and #dialog-box is the message box. It's pretty straight forward and I reckon you can use javascript to append this into BODY as well.
<div id="dialog-overlay"></div><div id="dialog-box"> <div class="dialog-content"> <div id="dialog-message"></div> <a href="#" class="button">Close</a> </div></div>
This is the first time I use CSS3. CSS3 is a hot topic lately because safari, chrome, firefox and IE8 start supporting it. Some of the websites like twitter has been using CSS3 as well. The following is the CSS code and I have added comments in each of the section.
#dialog-overlay {


    /* set it to fill the whil screen */

    width:100%;

    height:100%;


    /* transparency for different browsers */

    filter:alpha(opacity=50);

    -moz-opacity:0.5;

    -khtml-opacity: 0.5;

    opacity: 0.5;

    background:#000;


    /* make sure it appear behind the dialog box but above everything else */

    position:absolute;

    top:0; left:0;

    z-index:3000;


    /* hide it by default */

    display:none;

}


#dialog-box {


    /* css3 drop shadow */

    -webkit-box-shadow: 0px 0px 10px rgba(0, 0, 0, 0.5);

    -moz-box-shadow: 0px 0px 10px rgba(0, 0, 0, 0.5);


    /* css3 border radius */

    -moz-border-radius: 5px;

    -webkit-border-radius: 5px;


    background:#eee;

    /* styling of the dialog box, i have a fixed dimension for this demo */

    width:328px;


    /* make sure it has the highest z-index */

    position:absolute;

    z-index:5000;


    /* hide it by default */

    display:none;

}


#dialog-box .dialog-content {

    /* style the content */

    text-align:left;

    padding:10px;

    margin:13px;

    color:#666;

    font-family:arial;

    font-size:11px;

}


a.button {

    /* styles for button */

    margin:10px auto 0 auto;

    text-align:center;

    display: block;

    width:50px;

    padding: 5px 10px 6px;

    color: #fff;

    text-decoration: none;

    font-weight: bold;

    line-height: 1;


    /* button color */

    background-color: #e33100;


    /* css3 implementation :) */

    /* rounded corner */

    -moz-border-radius: 5px;

    -webkit-border-radius: 5px;


    /* drop shadow */

    -moz-box-shadow: 0 1px 3px rgba(0,0,0,0.5);

    -webkit-box-shadow: 0 1px 3px rgba(0,0,0,0.5);


    /* text shaow */

    text-shadow: 0 -1px 1px rgba(0,0,0,0.25);

    border-bottom: 1px solid rgba(0,0,0,0.25);

    position: relative;

    cursor: pointer;


}


a.button:hover {

    background-color: #c33100;

}


/* extra styling */

#dialog-box .dialog-content p {

    font-weight:700; margin:0;

}


#dialog-box .dialog-content ul {

    margin:10px 0 10px 20px;

    padding:0;

    height:50px;

}
Alright, I reference part of the javascript from jQuery modal window tutorial. I write a popup function for this dialog box so that it can be called easily.
$(document).ready(function () {


    // if user clicked on button, the overlay layer or the dialogbox, close the dialog

    $('a.btn-ok, #dialog-overlay, #dialog-box').click(function () {

        $('#dialog-overlay, #dialog-box').hide();

        return false;

    });


    // if user resize the window, call the same function again

    // to make sure the overlay fills the screen and dialogbox aligned to center

    $(window).resize(function () {


        //only do it if the dialog box is not hidden

        if (!$('#dialog-box').is(':hidden')) popup();

    });


});


//Popup dialog

function popup(message) {


    // get the screen height and width

    var maskHeight = $(document).height();

    var maskWidth = $(window).width();


    // calculate the values for center alignment

    var dialogTop =  (maskHeight/3) - ($('#dialog-box').height());

    var dialogLeft = (maskWidth/2) - ($('#dialog-box').width()/2);


    // assign values to the overlay and dialog box

    $('#dialog-overlay').css({height:maskHeight, width:maskWidth}).show();

    $('#dialog-box').css({top:dialogTop, left:dialogLeft}).show();


    // display the message

    $('#dialog-message').html(message);


}
No comments:
Post a Comment